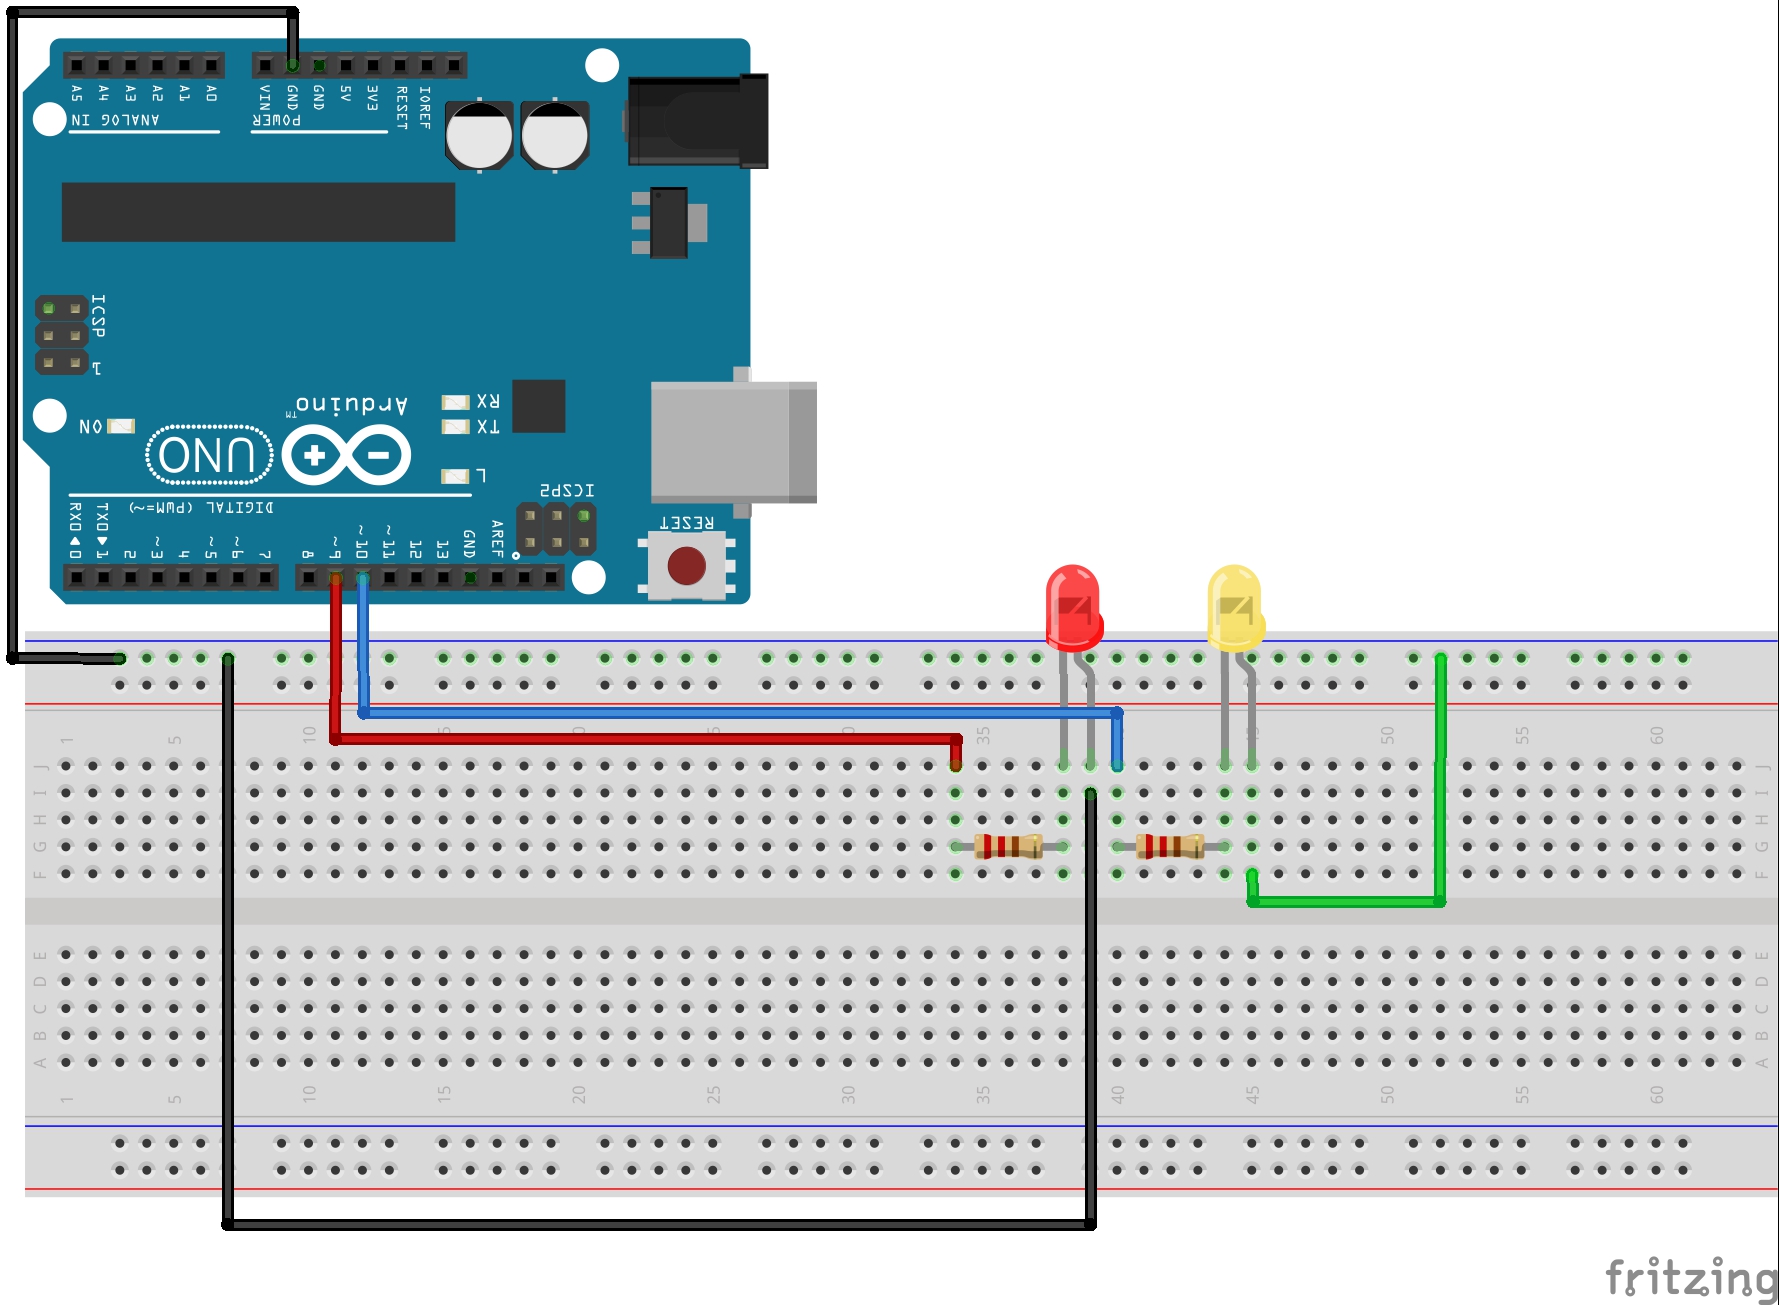
In Lesson 3 you learned about for loops, and how for loops can make your life as a programmer much simpler. You wrote a program that would blink a red LED and then a yellow LED the number of times indicated by the program. In this lesson, we will be using the same 2-LED circuit. If you don’s already have it put together, you should go ahead and do it now. This is a schematic of the circuit:
In order to independently blink the two LED’s you were probably using code similar to this:
1 2 3 4 5 6 7 8 9 10 11 12 13 14 15 16 17 18 19 20 21 22 23 24 25 26 27 28 29 30 31 |
int redLEDPin=9; //Declare redLEDPin an int, and set to pin 9 int yellowLEDPin=10; //Declare yellowLEDPin an int, and set to pin 10 int redOnTime=250; //Declare redOnTime an int, and set to 250 mseconds int redOffTime=250; //Declare redOffTime an int, and set to 250 int yellowOnTime=250; //Declare yellowOnTime an int, and set to 250 int yellowOffTime=250; //Declare yellowOffTime an int, and set to 250 int numYellowBlinks=5; //Number of times to blink yellow LED int numRedBlinks=5; //Number of times to blink red LED void setup() { pinMode(redLEDPin, OUTPUT); // Tell Arduino that redLEDPin is an output pin pinMode(yellowLEDPin, OUTPUT); //Tell Arduino that yellowLEDPin is an output pin } void loop() { for (int j=1; j<=numRedBlinks; j=j+1) { // Start our for loop digitalWrite(redLEDPin,HIGH); //Turn red LED on delay(redOnTime); //Leave on for redOnTime digitalWrite(redLEDPin,LOW); //Turn red LED off delay(redOffTime); //Leave off for redOffTime } for (int j=1; j<=numYellowBlinks; j=j+1) { // Start our for loop digitalWrite(yellowLEDPin,HIGH); //Turn yellow LED on delay(yellowOnTime); //Leave on for yellowOnTime digitalWrite(yellowLEDPin,LOW); //Turn yellow LED off delay(yellowOffTime); //Leave off for yellowOffTime } } |
As you learned in Lesson 3 for loops make your program much simpler to write and much simpler to modify. In the code above, to change how many times the LED’s blink, you just have to simply change two lines of code:
1 2 |
int numYellowBlinks=5; //Number of times to blink yellow LED int numRedBlinks=5; //Number of times to blink red LED |
By changing either of these variables at the top of your program, you effectively adjust how many times each LED will blink in each cycle.
Now besides just blinking the LED, it would be nice to provide some information directly to the user. It would be nice to be able to have the arduino ‘print’ information to your computer screen. You can do this by working with the Serial Port and the Serial Monitor.
In order to use the Serial Port, the first thing you have to do is turn it on inside your program. Since this is something you would only need to do once, you do it in the void setup(). The code below, when placed inside the void setup() will turn your serial port on:
1 |
Serial.begin(9600); |
You will want to keep whatever else you already have going on in your void setup(), and just add the line of code above to it. Note that this line of code tells the arduino to turn the serial port on. The ‘9600’ tells the arduino to communicate at 9600 baud, which basically is just the speed you will be working at. The higher the number the faster data will be sent and received over the serial port. This can be set to different numbers, but the important thing is that everyone is talking and listening at the same speed. So, if you tell the arduino to run at 9600 baud, when you open your serial monitor later, you need to make sure it is set to the same speed.
OK, now that you have started your serial monitor you can start sending and receiving data over it. The first and easiest thing is to send data to it. We do this using Serial.print and Serial.println commands. These commands send data to the arduino serial monitor. We will show you how to open the serial monitor in a minute, but for now, lets add some print statements to our program.
1 2 3 4 5 6 7 |
for (int j=1; j<=numRedBlinks; j=j+1) { // Start our for loop Serial.println(j); digitalWrite(redLEDPin,HIGH); //Turn red LED on delay(redOnTime); //Leave on for redOnTime digitalWrite(redLEDPin,LOW); //Turn red LED off delay(redOffTime); //Leave off for redOffTime } |
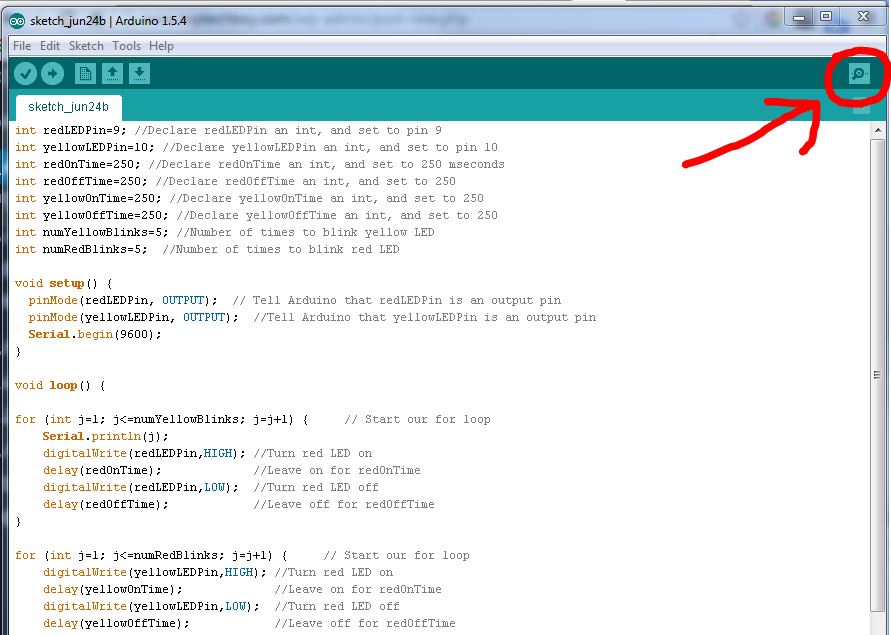
Notice that the loop above is our loop for blinking the red LED. We have added a new line to the start of the loop . . . Serial.println(j). After you add the line of code, download the code to the arduino, and then pop open your serial monitor. You do this by clicking on the magnifier icon at the upper right corner of the arduino IDE.
When you click on the icon you should see the serial monitor pop open, and you should see the values of j being printed out. It should look like this:
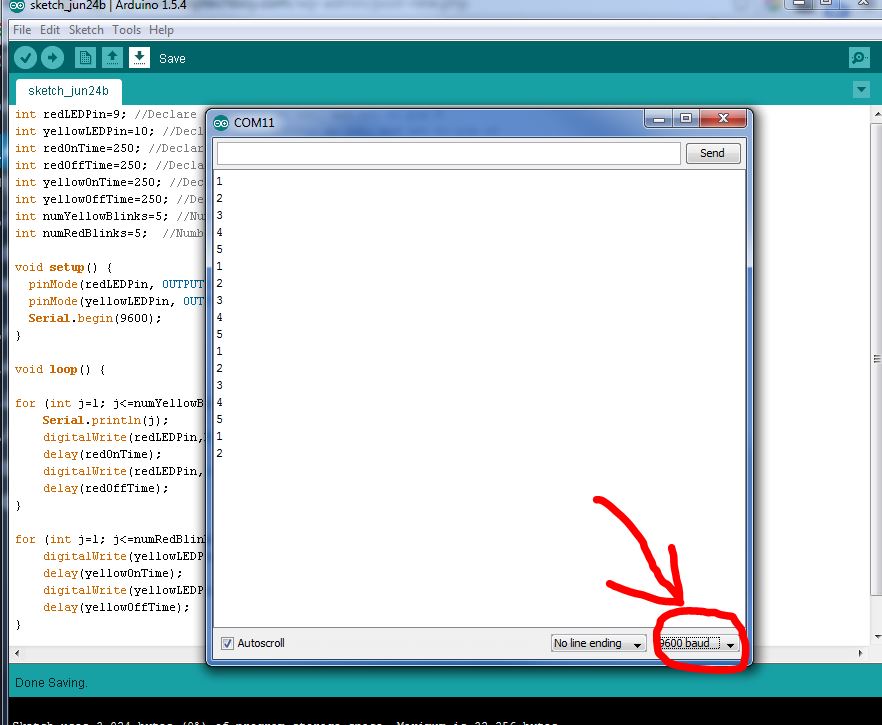
You should see the numbers printing out as your program goes through the for loop. Make sure that you have the baud rate set in the lower right corner of the serial monitor to the same value you specified in the program. 9600 baud is usually a good choice.
In the example above, we are printing the variable j each time the program loops through the for loop for the red LED. We can also print out a string of text. To print out a string of text, you put the string in quotes. To print a string you would do something like Serial.println(“Blinking Red LED”). It will print the words between the quotes. Lets add this to our code, but lets add it before the for loop, so it just prints it once each cycle. Your code for the red LED should look like this:
1 2 3 4 5 6 7 8 |
Serial.println("The Red LED is Blinking"); for (int j=1; j<=numRedBlinks; j=j+1) { // Start our for loop Serial.println(j); digitalWrite(redLEDPin,HIGH); //Turn red LED on delay(redOnTime); //Leave on for redOnTime digitalWrite(redLEDPin,LOW); //Turn red LED off delay(redOffTime); //Leave off for redOffTime } |
Now download and run the code and look at your serial monitor. You should see those words printing each time before the Red LED blinks. Now go ahead and add similar code to your Yellow LED loop so that it will announce which LED is blinking and then the blink counter. Your code should look like this for the two for loops:
1 2 3 4 5 6 7 8 9 10 11 12 13 14 15 16 |
Serial.println("The Red LED is Blinking"); for (int j=1; j<=numRedBlinks; j=j+1) { // Start our for loop Serial.println(j); digitalWrite(redLEDPin,HIGH); //Turn red LED on delay(redOnTime); //Leave on for redOnTime digitalWrite(redLEDPin,LOW); //Turn red LED off delay(redOffTime); //Leave off for redOffTime } Serial.println("The Yellow LED is Blinking"); for (int j=1; j<=numYellowBlinks; j=j+1) { // Start our for loop Serial.println(j); digitalWrite(yellowLEDPin,HIGH); //Turn yellow LED on delay(yellowOnTime); //Leave on for yellowOnTime digitalWrite(yellowLEDPin,LOW); //Turn yellow LED off delay(yellowOffTime); //Leave off for yellowOffTime } |
So this code will announce which LED is blinking, and will then give a count of which blink you are on. Pretty cool! Your Serial Monitor should now be looking something like this as it tells the user which LED is blinking and which blink you are on:
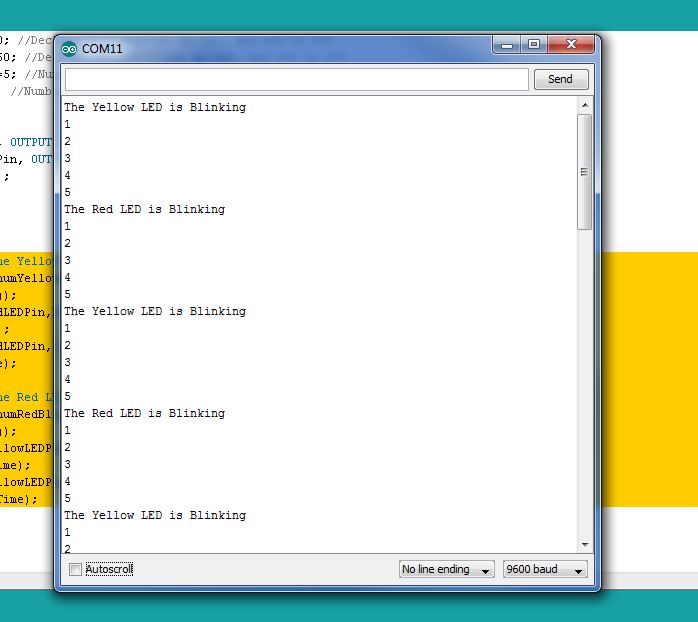
So we can see that we can print both variables, like j, and strings. When printing strings, it is important to include the text in quotes, so that the arduino knows you are printing the string of text, and not a variable.
Notice that each time you use Serial.println it goes to the next line. If you want to print to the same line, without advancing to the next line, you should use the command Serial.print. In the example above, lets say instead of just printing the number j, you want text in front of the number that says ‘you are on blink number ‘ and then the number. You can modify your code and add another Serial.print command to the for loops. I will do it for you on the red loop, but you need to figure out the yellow for yourself:
1 2 3 4 5 6 7 8 9 |
Serial.println("The Red LED is Blinking"); for (int j=1; j<=numRedBlinks; j=j+1) { // Start our for loop Serial.print(" You are on blink number: "); Serial.println(j); digitalWrite(redLEDPin,HIGH); //Turn red LED on delay(redOnTime); //Leave on for redOnTime digitalWrite(redLEDPin,LOW); //Turn red LED off delay(redOffTime); //Leave off for redOffTime } |
You should get something that looks like this:
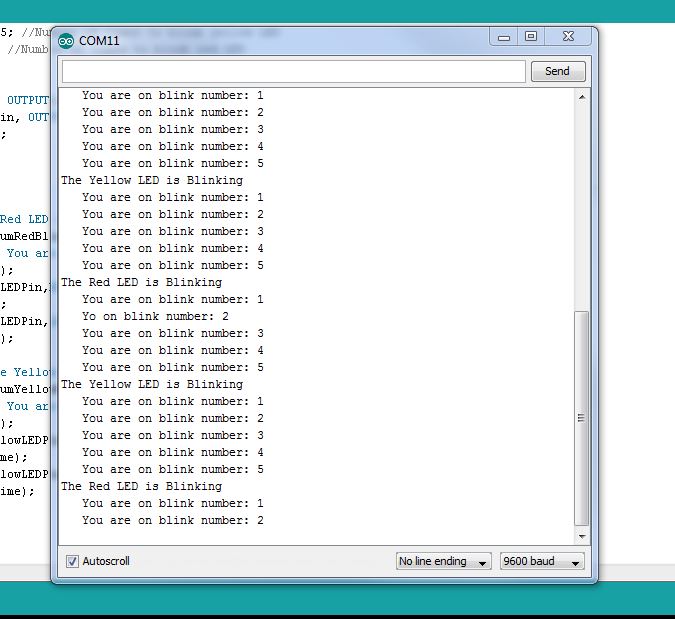
Make sure to play around with blank spaces when you print strings so that your output is neat and readable. Notice on mine that by using blank spaces I get an indent which makes the scrolling text more readable.
So, we need to carefully consider when it suitable to use Serial.print vs. when we should use Serial.println.
Hi Paul,
Nice Tutorial you have here. Good for newbies like me. i was trying this tutorial wherein u blink the Red and Yellow light alternatively ( 10 blinks each) ;But there seems to be an issue .Suppose i open the serial monitor midway of the yellow blink , the yellow blink stops and the Red starts blinking. Looks like the opening of the Serial monitor breaks the sequence and restarts the code . any means to counter this .
regards,
Naveen
No, any time you open the serial monitor it runs program from line one.
Excellent and thank you for leting us to learn from you experience.
Thanks a lot , i personally have gain from your wealth of experience.
Thanks! Great Lessons!!!
I am a newbe and really can understand the way you present the lessons. I’m looking forward to learn more.
Thank you,
John
Hi Paul,
Is there anyway that I can download or copy the lesson’s source code from the YouTube site?
Thank you,
John
John,
Is not the code right here on this page? I am confused what you are asking.
Paul,
I teach (as a guest instructor) 8th graders twice a week in their electronics class. I’m like the questioner, it would really help so that we all start the next lesson on the same page, to be able to CUT and PASTE the entire code onto a blank IDE screen, save it, and send it to each student. Otherwise, we end up with a mash of different code where the students have all been modifying/trying various things during a lesson and it’s not fun trying to start with all the various code for the next lesson.
Maybe I just don’t know how to get it. I’ve tried the CUT AND PASTE method here on some of your lessons but I only get that small amount of code that you are discussing.
OK, I may have figured it out. When I go to Lesson 5, the first thing you display is all the code that you ended Lesson 4 with. Is that correct? Thank you.
It’s really good explanation.Now in my first project I want to do controlled over motors and I already learn your four lessons.Now how should I start.
Sir,
I am new and I learn your four lessons,now
I have a doubt that from your lesson 3 ,if I want to blink in pattern like first red 5 times,then yellow 2 times then both alternate,then both should blink together but constant.What should be code?Please reply soon sir.
Thanks! Great Lessons!!!
Thanks for your lessons, I got a question, could you help me to fix? Thanks.
I just wrote few lines, and nothing in loop method, but that 2 Leds are all on, is it because of the board? (it ‘s a cheap one, only 9 bucks…)
int redLEDPin=7;
int yellowLEDPin=6;
void setup() {
pinMode(redLEDPin, OUTPUT);
pinMode(yellowLEDPin, OUTPUT);
}
void loop() {
}
The worker who packaged the board in china usualy flash some code in the board to test if working before shipping. Just upload some new code in the controller see if it fix the issue.
I just wanted to drop a line and say thank you for being so dedicated and taking the time to teach the fundamentals of the Arduino. I went to Amazon.com back a month ago and purchased the “Arduino Ultimate Starter Kit.” I was able to get through a lot of the projects and it was gratifying to create a basic theramin and temperature guage. I soon found though that going back again to basic LEDs on the bread board and taking more time to look at my coding with your lessons to be very helpful in getting into good habits and appreciating some of the deeper intricacy’s of uploading thorough and neat code into the arduino. I would highly recommend those that are getting a starter kit on Amazon to also use your lessons as a supplement if not starting from your lessons and then moving on to the projects in the ultimate Starter guide. I’m not very good at writing short comments, so I appologize for taking up so much space. I am happy to be able to express my appreciation for your teaching! Thankyou!
if I program this
int nrRoodBlink=2; //rode led blinkt 2 keer
int nrGeelBlink=2; //geel led blinkt 2 keer
int nrGroenBlink=2; //groen led blinkt 2 keer
It only blinks 1 time per led
If I increase the number its always x-1. (so 6times becomes 5, etc etc. Why?
Probably comes down to details of your for loop.
PJM
Paul, I am 60 years old and have tried many times to learn programming, fortran in college (1970’s), basic and pascal while in the navy (1980’s), java and html in the (1990’s) and i just gave up in the (2000’s). Then i discovered these neat little arduino units and YOUR lessons and it was like someone had turned on the lights for the first time. Suddenly it all makes sense. I guess I am a visual learner.
Glad you found the turotials helpful!
Can the data sent to the serial port be accessed by another program, say in BASIC, so it can be re-formatted and shown on the screen?
I’m 65 and new to Arduino. I’ve really enjoyed your tutorial. Very easy to grasp the programming of this versatile tool.
I have a program for PicAxe to use with a wind turbine I’d like to convert to Arduino. I think it’s possible, but not sure.
I had the same issue as David, i.e. wrong count on led’s.
Realized I was missing the “=” sign at “j<=redBlink ;" !!
Thanks for your brilliant tutorials!
Hi Paul,
Thank you for the neat tutorials! You really take things step-by-step and i am loving and learning a lot from it.
Can I command Two arduino pins at same time..?
Hi Paul Sir,
I just wanted to know if our void loop just contains a Serial.println or Serial.print statement is it necessary to have the arduino serial port setup and the arduino board connected. I assumed it wouldn’t be necessary however, the error pops up as Serial port COM6 not available and when I try to set to COM6, it is just greyed out. Please let me know the flaw. Thank you
Yes, the board must be connected to use the serial port.
Hi,
I am facing this error can someone Please help.
Arduino: 1.6.6 Hourly Build 2015/08/14 02:13 (Mac OS X), Board: “Arduino Uno”
forloopLED2:2: error: expected unqualified-id before numeric constant
forloopLED2:8: error: expected ‘,’ or ‘;’ before ‘int’
forloopLED2.ino: In function ‘void loop()’:
forloopLED2:21: error: expected ‘)’ before ‘;’ token
forloopLED2:21: error: expected ‘;’ before ‘)’ token
forloopLED2:23: error: expected ‘)’ before ‘;’ token
forloopLED2:23: error: expected ‘;’ before ‘)’ token
forloopLED2:26: error: ‘bblink’ was not declared in this scope
forloopLED2:30: error: ‘blupin’ was not declared in this scope
forloopLED2:30: error: expected ‘;’ before ‘)’ token
forloopLED2:32: error: expected ‘)’ before ‘;’ token
forloopLED2:32: error: expected ‘;’ before ‘)’ token
expected unqualified-id before numeric constant
This report would have more information with
“Show verbose output during compilation”
enabled in File > Preferences.
You’re forgetting your semicolons. ;;;;;
hi paul sir,
when i connect arduino to my pc , its tx rx led is blinking continuosly with some delay
and also i have a problem with my board . i cant able to upload programme on arduino .
i am getting this error
WARNING: Category ” in library EEPROM is not valid. Setting to ‘Uncategorized’
WARNING: Category ” in library SPI is not valid. Setting to ‘Uncategorized’
WARNING: Category ” in library SoftwareSerial is not valid. Setting to ‘Uncategorized’
WARNING: Category ” in library Wire is not valid. Setting to ‘Uncategorized’
Warning: platform.txt from core ‘Arduino AVR Boards’ contains deprecated recipe.ar.pattern=”{compiler.path}{compiler.ar.cmd}” {compiler.ar.flags} {compiler.ar.extra_flags} “{build.path}/{archive_file}” “{object_file}”, automatically converted to recipe.ar.pattern=”{compiler.path}{compiler.ar.cmd}” {compiler.ar.flags} {compiler.ar.extra_flags} “{archive_file_path}” “{object_file}”. Consider upgrading this core.
please help me
Probably your Ardruino chip has issues with the bootloader, which help it to load a new code on it, in this case I suppose you visit http://forum.arduino.cc/index.php?topic=27214.0
throw it away
Great lessons … thanks alot
Sir,
You have done this amazing job to make this learning experience so easy. I thank you a ton for your effort.
hi,
thanks for simplifying things, especially for those of us who do not have coding backgrounds
Thank you sooo much for these tutorials, I do appreciate it,
before I just watched a couple of lessons, today I typed the code and your words of advice that you have to type it yourself and not to copy and paste, sure made me see how many mistakes I got in this small program!!
What the point of printing over the Serial Port?
Well, if you want to see numbers where else would you put them? It is a way to send and see things on the PC.
Hi Paul, There are a mistake in the paragraph 7/ line 2, which was written on this page lesson 4. (Serial.prinln(j))
Thanks . . . fixed it.
Your lessons has really helped me. Thank You very much. You are a great great teacher!
hi , Paul you really have a great way of explaining this programming , I never liked it always taught it was too hard . Until i decided to get and Arduino to try it out and then i stumbled on you videos on youtube which led me to here . However i noticed with the above code that when i use three LEDs for some reason no matter hhow many times i change the number of blinks on the third LED i always get one blink less, on the output.