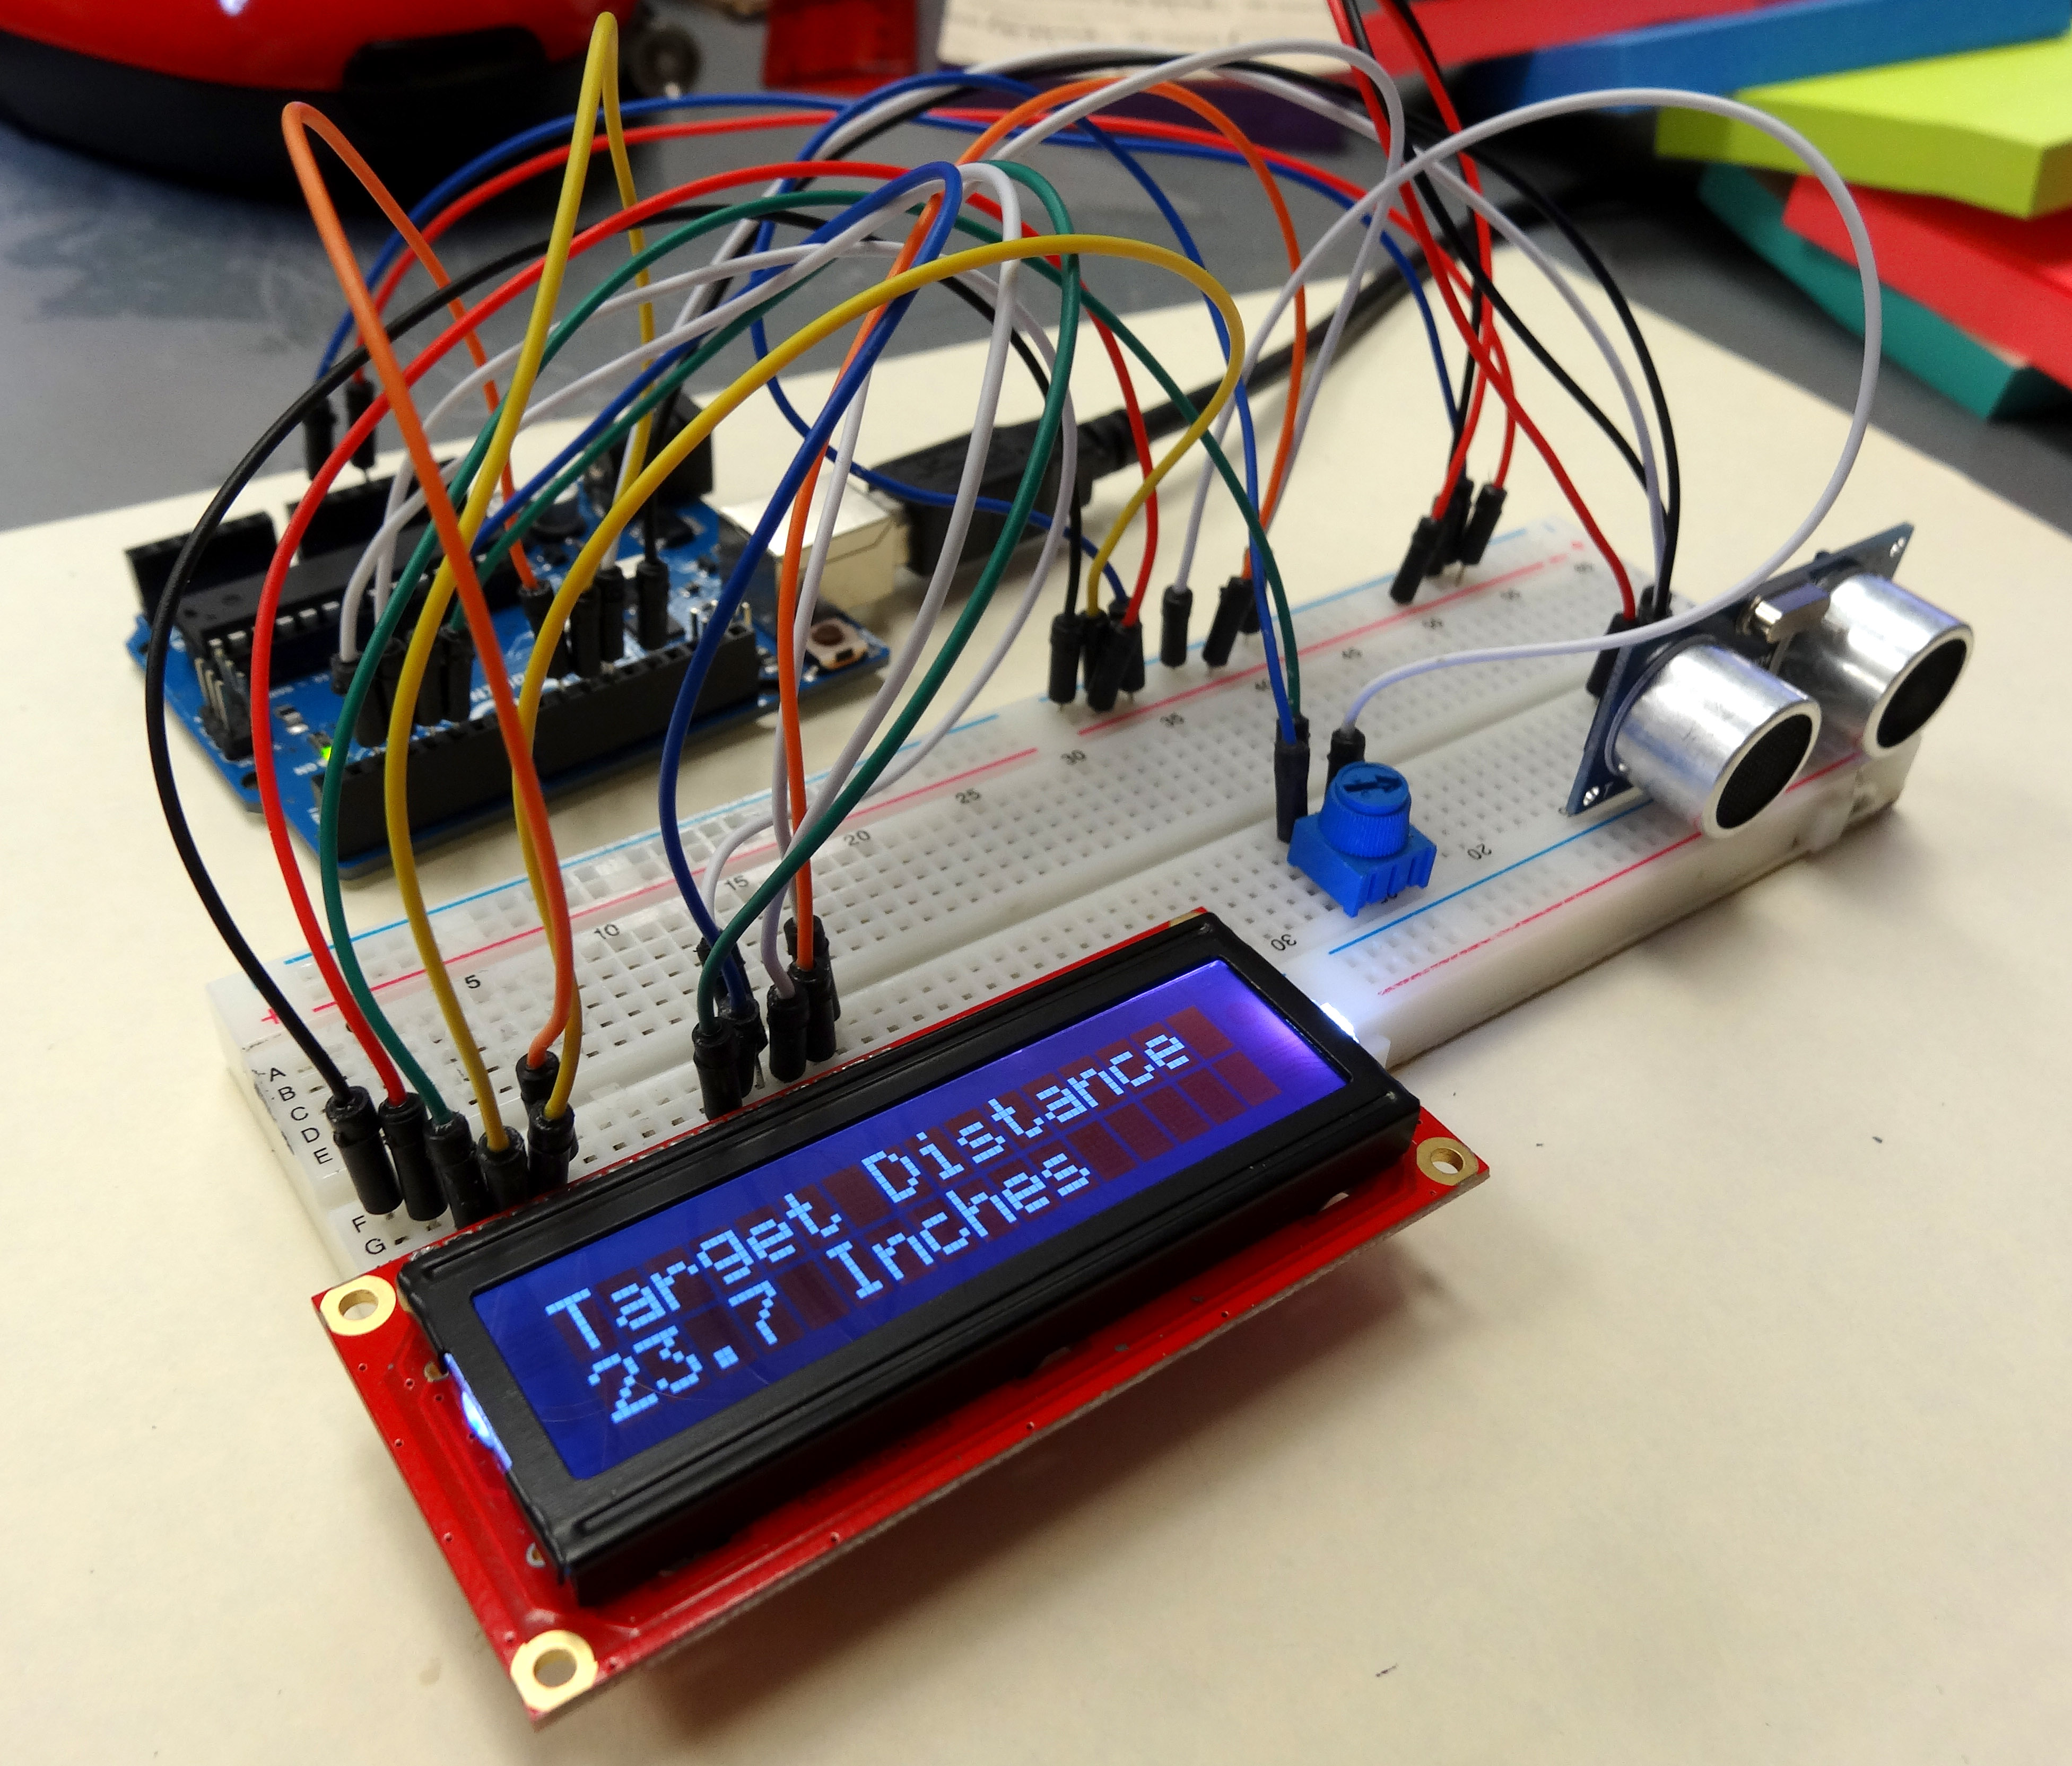
In LESSON 18 you learned how to use an ultrasonic sensor to measure distance, and in LESSON 19 you learned how to connect an LCD to the arduino. In this lesson we will combine what you have learned to create a circuit for measuring distance, and displaying results on an LCD display.

You can use the schematic below to connect the circuit. If you did LESSON 19, you should already have the LCD hooked up. For more info on connecting to the LCD, and how it works, review LESSON 19. This schematic is for the LCD in the Sparkfun Inventor Kit, or similar LCD. If you have a different LCD, you will have to determine the proper connections. There are some helps in LESSON 19. If you need the ultrasonic sensor, you can pick one up HERE.

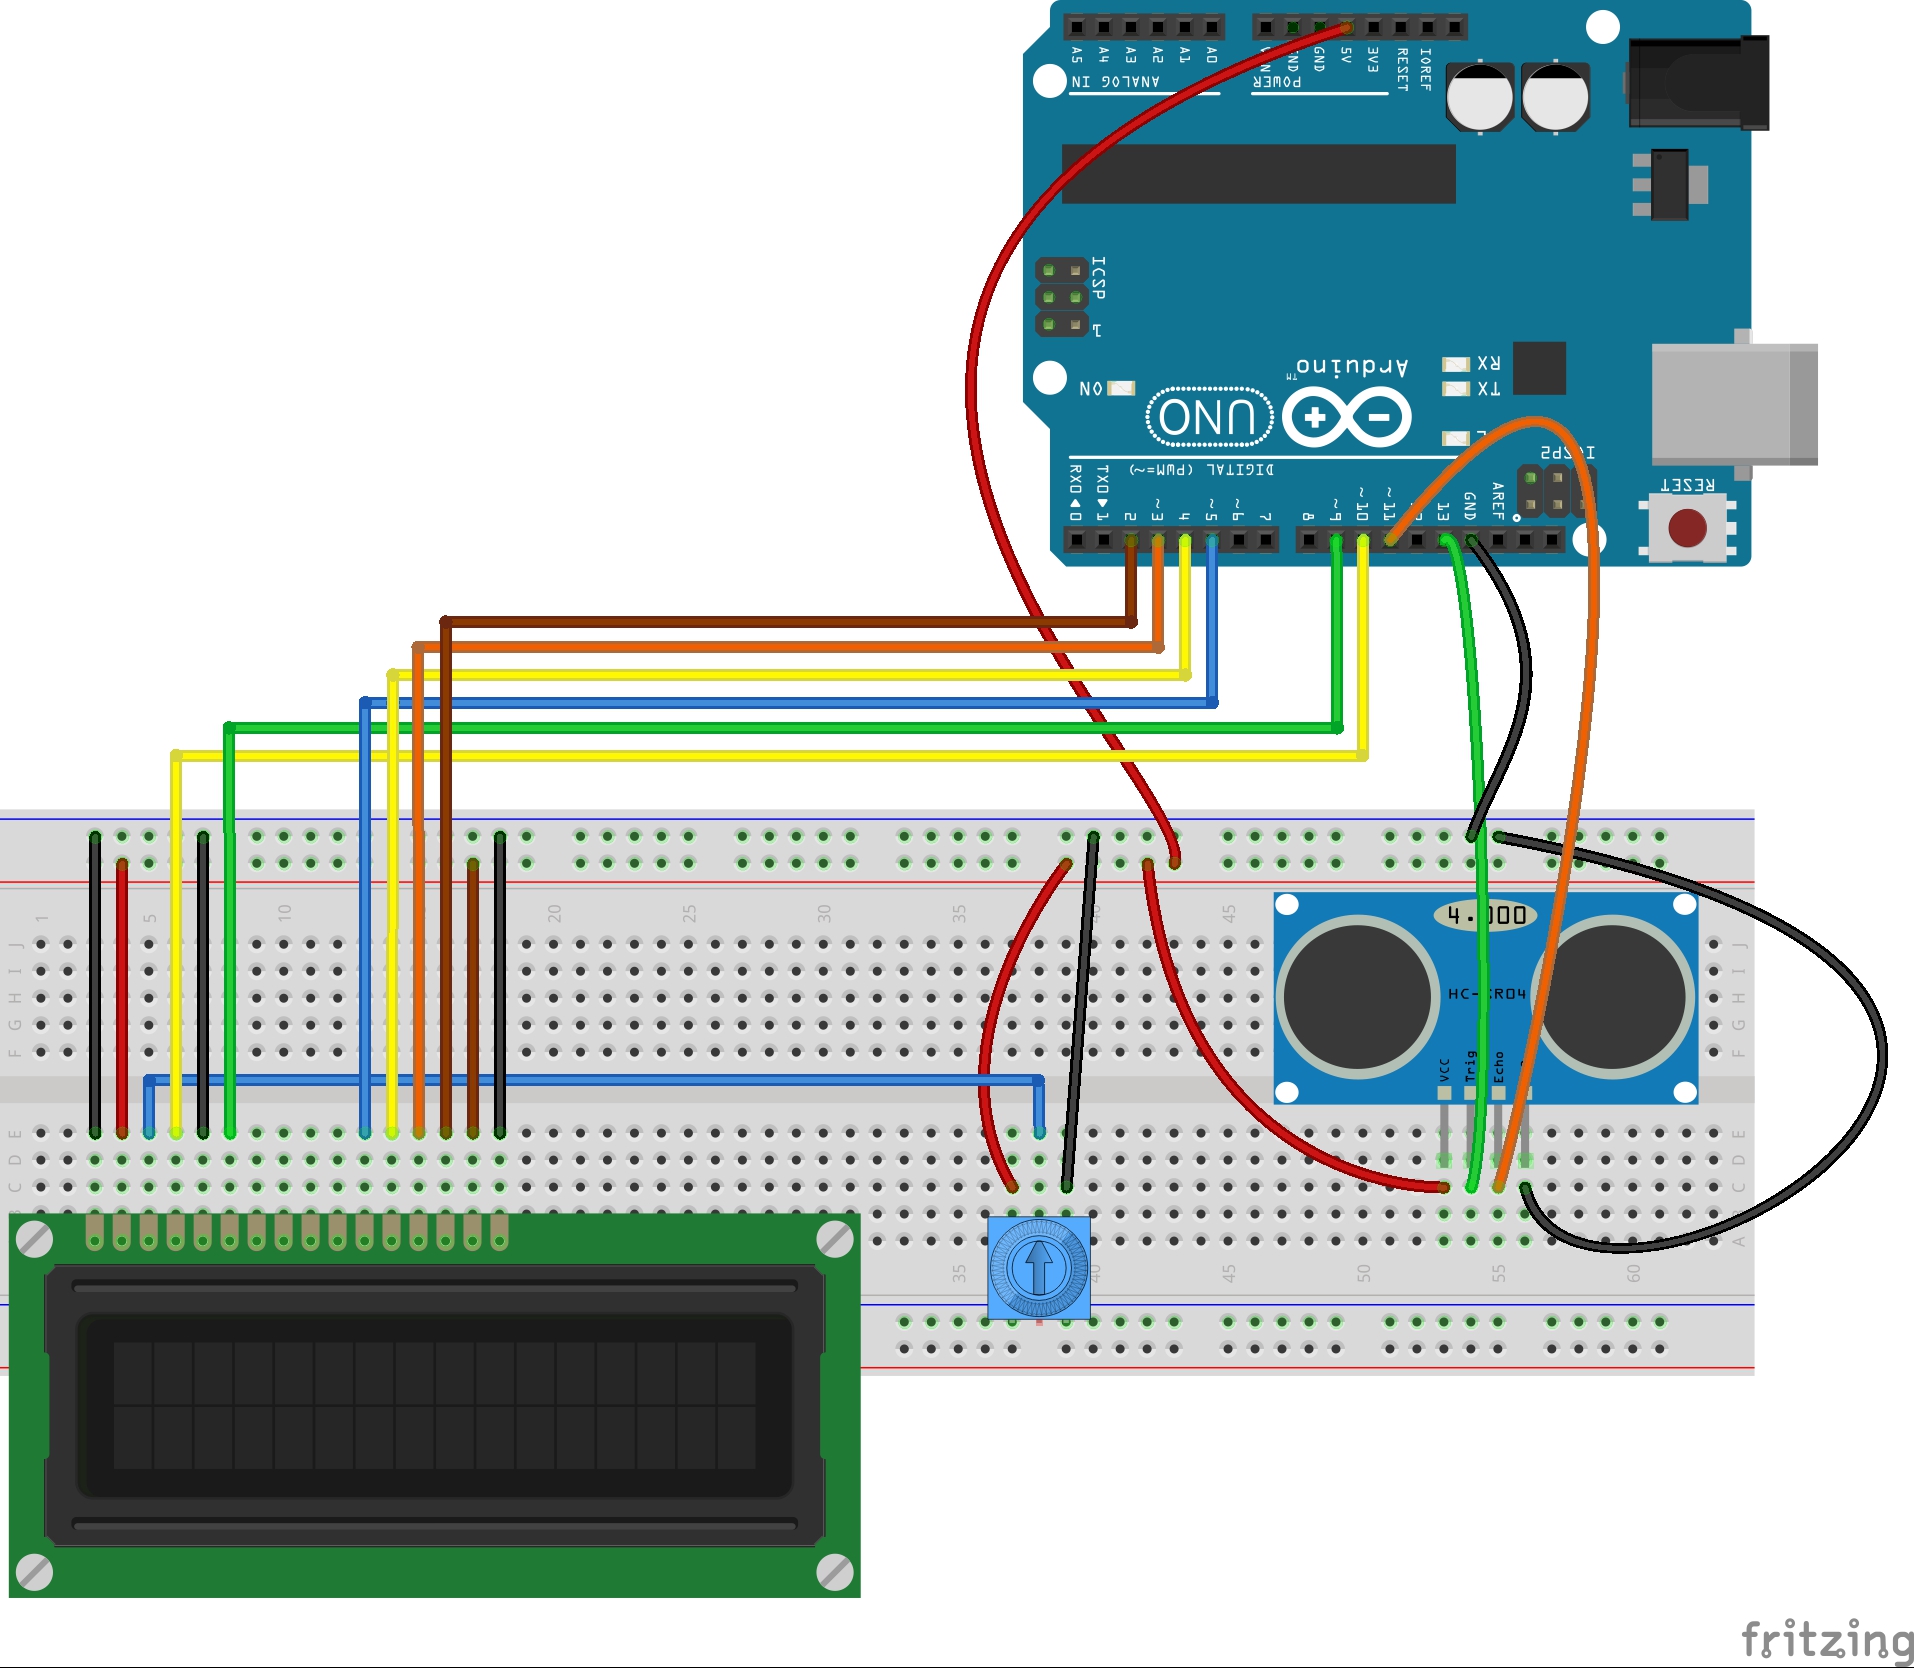
Be very careful connecting the circuit. Check your work, and it helps to work with a Buddy. Have one person looking at the schematic, and one looking at the circuit. Sometimes it is easier to get it right working in pairs.
Now the objective of this project is to measure distance using the ultrasonic sensor, and then display that value on the LCD display. You should have the skills you need from the earlier lessons. Try and do this project on your own, but if you get stuck, you can look at my code below. As always, don’t copy and paste my code, but it should be used as a guide to help you write yours if you get stuck.
1 2 3 4 5 6 7 8 9 10 11 12 13 14 15 16 17 18 19 20 21 22 23 24 25 26 27 28 29 30 31 32 33 34 35 36 37 38 39 40 41 42 43 44 45 46 47 |
#include <LiquidCrystal.h> //Load Liquid Crystal Library LiquidCrystal LCD(10, 9, 5, 4, 3, 2); //Create Liquid Crystal Object called LCD int trigPin=13; //Sensor Trip pin connected to Arduino pin 13 int echoPin=11; //Sensor Echo pin connected to Arduino pin 11 int myCounter=0; //declare your variable myCounter and set to 0 int servoControlPin=6; //Servo control line is connected to pin 6 float pingTime; //time for ping to travel from sensor to target and return float targetDistance; //Distance to Target in inches float speedOfSound=776.5; //Speed of sound in miles per hour when temp is 77 degrees. void setup() { Serial.begin(9600); pinMode(trigPin, OUTPUT); pinMode(echoPin, INPUT); LCD.begin(16,2); //Tell Arduino to start your 16 column 2 row LCD LCD.setCursor(0,0); //Set LCD cursor to upper left corner, column 0, row 0 LCD.print("Target Distance:"); //Print Message on First Row } void loop() { digitalWrite(trigPin, LOW); //Set trigger pin low delayMicroseconds(2000); //Let signal settle digitalWrite(trigPin, HIGH); //Set trigPin high delayMicroseconds(15); //Delay in high state digitalWrite(trigPin, LOW); //ping has now been sent delayMicroseconds(10); //Delay in high state pingTime = pulseIn(echoPin, HIGH); //pingTime is presented in microceconds pingTime=pingTime/1000000; //convert pingTime to seconds by dividing by 1000000 (microseconds in a second) pingTime=pingTime/3600; //convert pingtime to hourse by dividing by 3600 (seconds in an hour) targetDistance= speedOfSound * pingTime; //This will be in miles, since speed of sound was miles per hour targetDistance=targetDistance/2; //Remember ping travels to target and back from target, so you must divide by 2 for actual target distance. targetDistance= targetDistance*63360; //Convert miles to inches by multipling by 63360 (inches per mile) LCD.setCursor(0,1); //Set cursor to first column of second row LCD.print(" "); //Print blanks to clear the row LCD.setCursor(0,1); //Set Cursor again to first column of second row LCD.print(targetDistance); //Print measured distance LCD.print(" inches"); //Print your units. delay(250); //pause to let things settle } |
Your assignment is to get this project going, and show that you can measure distance and then display it on the LCD. After showing me your work, then you need to take the project in your own unique direction. What can you make based on what you have learned in the last few lessons. You should use some combination of Ultrasonic Sensor, LCD, and Servo to make a project or product or your own invention. You have the technical skills, you have the equipment, now go be creative!
Hi,
this is one of the best arduino series tutorials I have seen on the internet. Thanks for that.
So based on this I am creating some project, actually I created it but I am trying to resolve some problems, but I am not familiar with some characteristics. For example, I need to test distance for object with just 2 cm height from the bottom (floor), but if it is two meters from sensor it does not show anything, like there is no any item. I need to test for example when someone steps in front of the sensor where his feet are, but not higher than that (because feet and knees, or back of the knees are not int the same line ). As I tested longer range from sensor item needs to be higher, but I need distance just 2 cm above the floor in range less then 3 m.
And second problem is when item is on longer range from sensor it is not precise, for example, when I check distance in range of 20 cm, precision varies from 0.5 cm to 1 cm, but on longer range it is from 2 cm to 6 cm, so is there a way to create more precise measure.
Tnx again for this tutorials.
Best regards,
Nenad
You will probably have to use something other than ultrasonic sensor. I am not sure what to suggest.
Sir I’m getting problem with code could please help me
I want real code which you apply
Hmmm, ok, tnx anyway…
I will try to find solution…
I am likely to get detention for saying this …. but I just built one of these units with copy and paste! just correcting for UK “mm” not old English feet and inches! Its just amazing performance, I purchased a cheap sensor off ebay for £ 0.99p approx. $1.50. Having tested it out in the house, its best results are off surfaces like tile and glass, where it is giving me +/- 30mm at 3000mm. At the other end of the scale up close, it is much better performance. The error is the range of 1/2 mm measuring under 300mm lengths. The sensor however cannot work under about 20mm as the ping from the sender needs to reflect back into the receiver. Why was’nt school this much fun when I was there? we only had batteries and bulbs…
does lesson 20 also apply to the arduino 2560 mega microcontroller
The way you teach the lessons is fantastic. I really enjoy how can I learn the content as easy as possible :), but also have a question, how is writing (uploading) programs procedure in Arduino micro controller? I mean when I upload for example this program into Audrino and then decide to upload another program, does it keep my previous one or overwrite new program on previous one?
Thanks a lot
When you load a program onto arduino, it erases whatever was there earlier.
Hi,
I baught a HC-SR04 ultrasonic sensor and connected to arduino to measure distance. It works perfect but with a problem. If it measures out of range distance, the echo pin remains high forever. If I switch off/on the power and put a obstacle, it works again but again if distance exceeds the limits, echo pin freezes to high state and does not goes low. It should go low after 1 second as time out but it is not going low.
I’m try to code to enable arduino to find the thickness of an object. So i need to store the first value measured and minus with the new value measured but i have problems to store it (is it possible?)
I would just use two different variables
This is exactly the same sensor that I am using and my sensor worked perfectly. I expect there is something in your coding. Go back to lesson 18 and try out the sensor there.
thank you one more time for great teaching! I’ve just built the circuit but have a problem with my lcd display as It shows absolutely nothing after uploading the program, the only thing it shows is first row high contrast which changes with potentiometer. what can I do in this situation?
Check your wiring very carefully. It sounds like their might be an error on connection. Make sure you have the same pinout as the lcd I am using.
Check spec sheet on your lcd
Absolutely great tutorial site. Starting one month ago, reading some Arduino books and watching your videos I have built a device to determine the scale speed of model trains and a device to prevent model trains over running a buffer stop. There is a lot of electronics available commercially for model trains although it is much more fun to code, design and built your purpose specific devices with Arduino. Many, many thanks again.
Glad you are finding the lessons useful. Thanks for the feedback!
Your tutorial videos are above and beyond. Thank you for your time. I have a design question. I have a spring on my property. A cistern of 550 gallons at bottom of hill. It has a solar pump system there at tank #1. Tank #2 is up the hill and is 2500 gallon. I want to have ultrasonic sensor in each tank. Tank #1 sensor tells arduino its full or to shutoff to prevent dry run at 50 gallons. Then allows pump to kick on when sensor in tank #2 is low with a full shutdown. I know its alot but im not sure how to go about this. Im gonna use arduino relay to control ssr for pump motor
Any help would be greatly appreciated
Thank you very much Mr.Paul believe me that your tutoriels don’t let me sleep the night ,i’m so impressed by the method that you use to simplify the information .
Thank you again.
Mohamed.
hi there
i have followed what you had done.; however, the LCD showed me inconsistent results of the distance.
What is that three pin blue colour object is??
It is the potentiometer.
Sir your code is showing in error
Redefinition of void setup()
Please help what to do
Can you suggests the name??
Hello, sir
I want to ask, I want to make the project a parking crossbar otormatis use arduino and ultrasonic sensors, please help me program the required code, which prinsif the appliance is working within a maximum of 100 cm. if a car passes from the front of the sensor bar will be open.
tanks
hi, there
i want to tell the distance by using speaker ,so plz help me how to sample the digital signal to audio
there is no vedio till this lecture that how to privide information by audio to the user..plz help me with that..
i think its better if you don’t write
LCD.print(“Target Distance:”); in setup function.
but you write
LCD.clear();
LCD.setCursor(0,0);
LCD.print(“Target Distance:”);
LCD.setCursor(0,1);
LCD.print(targetDistance);
LCD.print(” inches”);
in loop function..
@godit, you suggestion makes it even ‘poor’ coding. It’s because the top line of LCD is NOT changing at all in the loop. If your suggestion is followed than the same info get printed on the top line of LCD each time of the loop activity…hence wasting so many unnecessary clock cycles of resouces. So it is better ‘as is’….
The only thing in the code I can see is that Serial is initialized : serial.begin(9600); but never used anywhere after that but it doesn’t affect very much in resources.
what does the servo control pin in the coding stands for ?
Oops . . . that is left over code from another line. It should not be there. It was when we were controlling the servo position, which is not used in this project.
What calculation must be done if we need to measure the distance in cm. or any other measuring units say meter ?
@Silver line, just use your common sense …since on the top section of the code it is given as: float speedOfSound=775.6 miles per hour. You can make your own for km/hour etc as is used in your country. Down-under they use KMeters so you can get help from Ozie sites.
In USA we only use miles and inches for distance so in our mind it is that way.
hello,
I want this to make as my own project, there is a question in my mind that can I add additional feature like indicator i.e. sound of “beep” in this project just for small range like 5cm?,
if yes then how will I connect this and what additional code will be written?
And if you have any link please share.
Thanks 🙂
i like your cours thks a lot
Questions
1.) servo is being int?
int servoControlPin=6; //Servo control line is connected to pin 6 –
2.) there is a LOW voltage delay after the ultrasonic has been sent a pulse (comment says “high state” but is actually LOW):
digitalWrite(trigPin, LOW); //ping has now been sent
delayMicroseconds(10); //Delay in high state
Does this delay subtract from the ping time? in mean to say wont this cause an error of -10mS in the measurement? or does the ECHO pin go HIGH when ping is sent automatically?
3.)I am trying to combine all the unit conversions into one or two constants but when i devide by such a large number i end up with zero. Is there a limit to the floating point positions?
Thanx for everything, i love the videos, and am building right along with you, but making the code my own
I think i figured out my problem on question 3:
i was missing (and so are you in your example above) the decimal point at the end of the conversion constants.
can you help me to communicated between arduino uno and URM06-rs485 ultrasonic sensor. i dont know how to use it
I have not used that unit so can not offer any help. Good luck with the project.
By this lesson, how to program and install it with a buzzer act it like a reverse sensor?
Hi
I want to Mix 2 Programs
The First Program Solenoid valve
The Second Program MQ4 Sensor
i want when the MQ4 sensor Intuit Methane gas then the Solenoid valve open
what should i do ??
in the display it shows
000<-0 0<-<-<-0-i0i
it do not display any letter or word
kindly help me.I have followed your instructions and have done what u have said in your lessons.i am also using 16*2 lcd and POT. But i am not getting any display on my lcd. i can adjust the brightness but still no display
Hello Sir,
Can you make this project with inches and centimeter.
Is it possible to measure the speed of a rolling ball toward and from the sensor using the millis() function. Please let me know sir if this is a good implementation and practice idea
Which value potentiometer has ben used???
I would like just to say how good your lessons are and how great is your way to teach people. I’m 58 and so happy that I met you in this website.
My congratulation for your great effort.
Sir, I highly appreciate your work. This project helped me so much and it worked perfectly. As you said to do something more interesting to modify it, I want to use this sensor as a visitor counter and I am not getting the coding part for this. Please help me in this.
Sir,
By using this project.
Q-1) How to detect a motion of object of speed 60km/hr -80km/hr?
Q-2)which ARDUINO board(Single) is best for to use 7 sensor?
The ultrasonic sensor would not be suitable for measuring speed. Its range and sensitivity would not be adequat for that.
hi,just wondering whether you have advanced this project to calculate area with two readings.
I am a high school teacher with minimal arduino experience and none with the distance measuring sensor. I had an idea to put different balls in a pvc pipe or graduated cylinder and use the distance sensor to collect the distance measurements as the ball bounces inside the tube. Is this something that could work?
Maybe. You should try it and see. Good chance it would work. Only potential issue would be if you got some sort of reflections off the inside of the tube. A good idea, worth trying in my mind.
Thank you so much for your prompt reply! That is great news that you think it could work. I will dive in and see what I can do with it.
thanks good job…
Thanks you Sir’ for the tutorial it has helped me a lot with my project.
Hello Sir,
Very great lesson about ultrasonic sensor and LCD.
I am currently doing my school work about measuring angle (respect to a reference line through ultrasonic sensor) and distance with Arduino UNO, LCD, ultrasonic sensor (HC-SR04), resistor and rotatory potentiometer onto of which the ultrasonic module will be mounted. I can rotates the sensor. I want to ask does the potentiometer measure the angle when it is rotated or the ultrasonic sensor measure the angle by some equation. Also, what is the code about measure angles, please?
Thanks a lot.
Hello
Great work, I have made it. The only thing is my LCD is flickering, how can I avoid that?
Best regards, Stig!
Make sure you are not clearing/writing/clearing/writing. This will cause a flicker. Only clear LCD when you need to.
Hello admin
It is not the text that flickers it is the backlight that turns on and off. I can make it flicker so fast that it is barely seen by changing the last delay to 5, but can not get totally rid off the flickering backlight. Any other suggestions?
Best regards
Stig!
Good work,really interesting project
perfect , thats what i need
sir ,its working good ,please give the program connecting buzzer
Can I use this project in Proteus V8.0 and I want send me the code and daigram. And I want use Multi Ultrasonic sensors… Thanks
can i get a circuit diagram which is more easy to understand
sir, could ultrasonic sensor detect the thickness of a object?
Sir,
If I want use 20×4 LCD ,ultrasonic sensor
And servo with Arduino at that time
Can I connect the LCD 20×4
As like 16×2 ?
Hey Paul,
Fantastic tutorials. I have done them all (20x) in 3 weeks, no “copy n paste”, following you step by step. Thank you so much!!!
I’ve been programming ksh, perl, pl/sql, php, python etc for 20 years for other people. It has been so nice to programme something for myself and rekindle my passion for electronics.
One minor suggestion if I may? It appears that the “Sparkfun Inventor Kit” that you refer to is now deprecated(retired) and no longer for sale. Perhaps for those that want to learn but can’t buy the kit you might post the make/model number of some of your major parts? (eg. the servo & LCD).
Regarding the LCD…. It is worth noting that using the standard bread board and rack mount pins alone will not make it easy on construction for the LCD Lessons. The contact between the PCB and the connectors is insufficient to create a firm contact, ergo, consistent connection between all pins and the Arduino. I ended up soldering snap off rack pins to the board so it would mount to the breadboard. Not sure if this was a “assumed” knowledge or not but did make the lessons much easier to complete after the soldering had been affected.
Thanks again, wonderful series, probably the best I have seen yet on the net. Now I am confident I can move on to new projects with all the necessary skills to self-learn as I go.
Kind regards,
K
PS. It’s great to finally put the Algebra and cartesian math I learned 30 years ago to a practical use! Really fun to see how calculating Slope and plotting equations can be used in a fun project.