
In earlier lessons we learned how to turn pins on and off with the Arduino digitalWrite command. This is great if you only want 0 or 5 volts. In this lesson we show how you can get the in between values by using the analogWrite command. In later lessons we will show more specifically how analogWrite works, but this present lesson gets you started, and shows you how to control brightness of an LED. In all these lessons we are using the Arduino Super Starter Kit, which you can pick up HERE.
All posts by admin
Arduino Tutorial 6: Build an LED Binary Counter
In this lesson we take you step by step through how to build and program your own Binary Counter. In lesson 5 we showed you how to count in Binary, and how Binary numbers work. In today’s lesson, we show you how to practically implement a binary counter using the arduino and LED’s. We are using the elegoo kit, which you can pick up here.
Arduino Tutorial 5: Understanding and Working With Binary Numbers
In this series of Tutorials, I really want you to understand the magic that is happening under the hood of your digital devices. Whether you are talking about in Iphone, a laptop or a digital camera, they all work on the same, very simple principle. That principle is as follows. Any thing around you in the physical world can be represented as a number. You can create a different number for each letter, so letters can be represented by numbers. By stringing those numbers together we can create words, paragraphs and even entire books. Similarly, music and colors can be represented by numbers. At their core, digital devices only understand numbers, so everything around you must be converted to a number for the computer to understand it. The thing is, though, that computers only understand special numbers, known as binary numbers. Binary numbers contain only two characters . . . “0” and “1”. Hence all numbers must be converted to sequences of zeros and ones strung together. With this, any number you can come up with can be represented equally well by a long sequence of zeros and ones. This video shows how Binary numbers work.
Digital devices are simply made up of very large numbers of tiny switches. A modern digital computer might have over 10 billion switches cleverly connected together. Each switch can be thought of as a zero or a one. Hence, even though a switch is a very simple device, when you have lots of them, very complicated things can be done.
Arduino Tutorial 4: Understanding Arduino Variables
In our earlier lessons we would program using “constants” when we needed numbers. For example, if we wanted to set pin 13 to an output, we would use the command:
pinMode(13, OUTPUT);
The problem with using constants like the number 13, if you decided later to use pin 8 instead, you would have to edit every line of code that used that number. It is much better practice to use variables when coding. In this video we show you have to program using variables. We start by doing things the wrong way, using constants, then show you the advantages of using variables.
Hopefully you can see from this video how much better it is, and more efficient to use variables instead of constants. In all the future lessons, we expect you to use variables.
Arduino Tutorial 3: Understanding How Breadboards Work
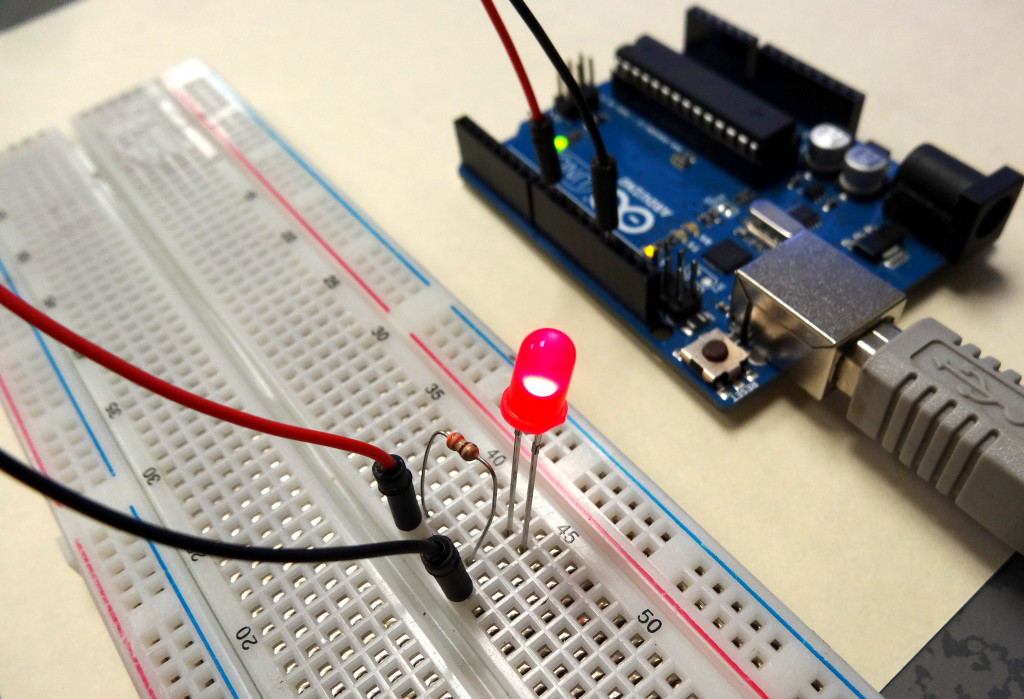 The cool thing about the arduino is you can program it to interact with the real world. The arduino can connect to and interact with a variety of sensors and actuators which allow you to monitor what is happening around you, and to control things like motors, relays, and servos. To do this though, you need to be able to connect components to the arduino. For prototyping, that is most easily done by using a breadboard. If you want to play along at home, and follow all these lessons with the same components I am using, you can order this Arduino kit.
The video below describes in detail how to use a breadboard, and even helps you get your first circuit prototype up and running.
As explained in the video, key to using the breadboard to create circuits is to understand how the little holes on the breadboard are connected. This graphic will help you understand which holes are connected and which are not.
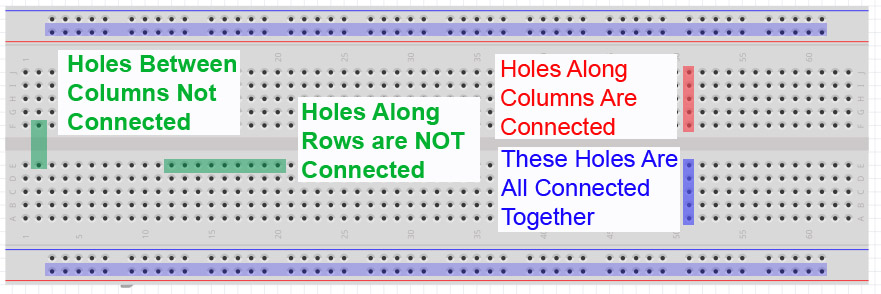
Study this graphic, and make sure you understand how the breadboard works. You can see that to connect two leads together, they should be plugged into the same column on the breadboard. It does not matter which column, as long as the two leads are in the same column.
It will take some practice, but if you follow the video carefully, you should be able to get your first circuit connected and working.